Install with the setup program
The setup program installs YTCC on a Windows server as a Windows service, which starts with Windows before anyone signs
in. It is one file, ytcc-<version>-windows-x64-installer.exe, for example ytcc-1.5.3040-windows-x64-installer.exe,
and needs no internet connection and no .NET on the server. The same program upgrades an installed YTCC, adds and
removes drivers, repairs the installation and removes YTCC with a backup of its projects.
The setup program brings the YTCC programs, the web interface and everything they need to run, but no users and no projects of yours. Some setup programs also bring sample projects.
Version lines
Each setup program belongs to a version line: the major and minor version, for example the line v15 for 1.5.x. A
later setup program of the same line upgrades the installation in place. A setup program of a new line, such as 1.6, is
installed next to the old one with its own folder, service and databases, and leaves the old line as it was.
Line v15 (1.5.x) | |
|---|---|
| Default folder | C:\ytcc\v15 |
| Windows service | YTCC v15 in Services |
| Entry in Settings › Apps | YTCC 1.5 |
| Shortcuts | YTCC v15 (Edge) and YTCC v15 (Chrome) |
Only one project runs on the computer at a time, in whichever line. Settings › YTCC installations on this computer on the home page shows the lines installed on the computer and which one runs the project; see Application settings.
Before you begin
- The server meets the requirements. Install these two programs first; the setup program does not
install them:
- PostgreSQL 18 with its default service name
postgresql-x64-18and port 5432. Note the password you give thepostgresuser during its installation. - Node.js LTS, version 20 or later, installed for all users.
- PostgreSQL 18 with its default service name
- You can approve administrator rights on the server. Windows asks for them when the installation starts.
- If YTCC already runs on the server, choose a time when field monitoring may pause for about five minutes, and inform the operators.
If one of the two programs is missing, the Pre-flight check page of the wizard shows it in red with a download link (step 6), so you can also start the setup program first.
Steps
1. Start the setup program
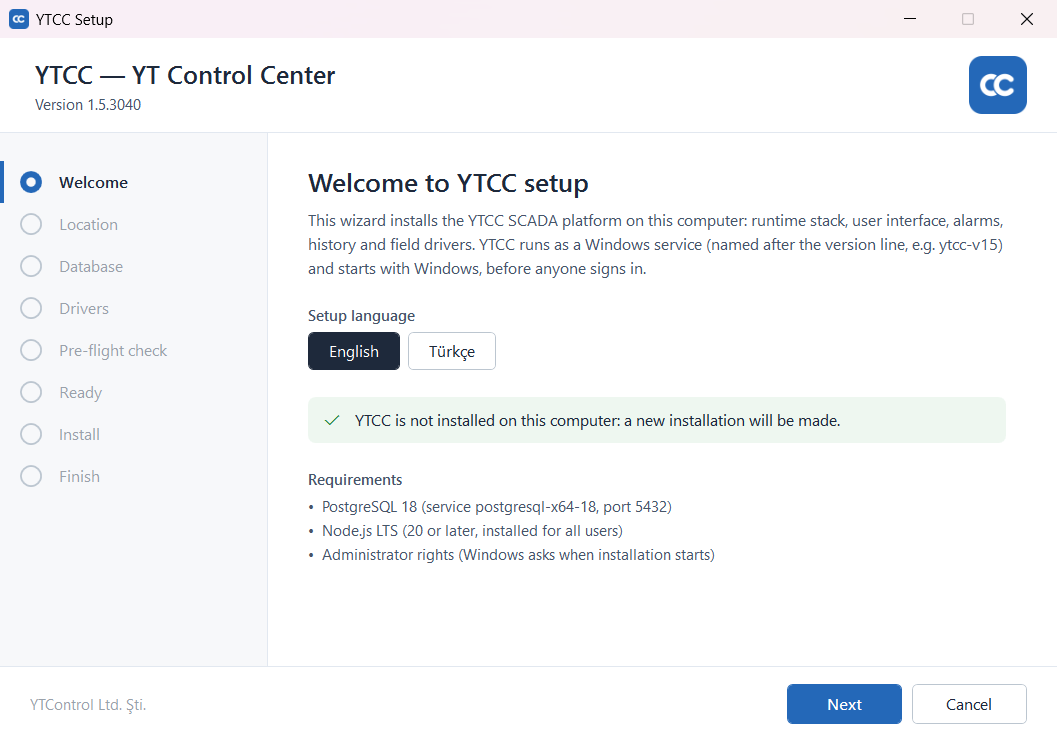
Double-click ytcc-<version>-windows-x64-installer.exe. The wizard YTCC Setup opens on the Welcome page, in
English. To use Turkish, click Türkçe under Setup language; the language applies to every page. The list on the left shows the pages of the wizard and where you are.
The Welcome page lists the Requirements and says what the setup program found on the computer:
| Message | Meaning |
|---|---|
| YTCC is not installed on this computer: a new installation will be made. | A new installation. |
| YTCC <version> is installed on this computer and will be upgraded to <version>. | An older version of this line is installed; it is upgraded, and the projects, databases and settings are kept. |
| Other YTCC versions are installed on this computer | Other lines are installed. This line is installed next to them, and they are not changed. |
| A newer YTCC (<version>) is already installed. | An older version cannot be installed over it. Next stays disabled. |
| A YTCC installation from before version lines exists in <folder> | An early YTCC installation, for example in C:\YTCC. If its folder overlaps the folder of this installation, remove it in step 2. Windows does not distinguish upper and lower case in folder names, so C:\YTCC and C:\ytcc are the same folder. |
Click Next.
2. Choose what to do with the installed YTCC
When YTCC is already installed, the YTCC on this computer page opens next. It lists every YTCC installation found, with its version, folder and service, ● when it runs and ○ when it is stopped. An installation that runs now is marked RUNNING NOW (field monitoring stops).
Stop YTCC now stops the running installations at once; Windows asks for administrator rights. If you do not stop them, the setup program stops them itself during the installation. Either way field monitoring pauses for about five minutes.
Under What do you want to do?, choose:
| Installed | Choices |
|---|---|
| The same version | Change drivers (add or remove field drivers), Repair (reinstall missing or damaged program files; settings and projects are kept), or Remove the ticked ones, then install fresh |
| An older version of this line | Upgrade (recommended): the projects, databases and settings stay in place. Or Remove old installations, then install fresh |
| Other lines only | Install (other installations stay as they are), or Remove old installations, then install fresh |
Ticked installations are removed only with the remove choice; the other choices do not touch them. An early installation whose folder overlaps this one is ticked and the remove choice is selected already. See Remove old installations, then install fresh.
3. Choose the installation folder
On the Installation folder page (Location in the list on the left), keep the default folder or click Browse… and choose another one. The default is
C:\ytcc\v15 for the line v15. If other lines are installed under another root, the default is the line folder under
that root, for example D:\ytcc\v15 when v16 is in D:\ytcc\v16. If this line was installed before, its previous
folder is suggested. During an upgrade the folder cannot be changed, because the projects and the runtime data are in
it. The page shows the free space on the drive.
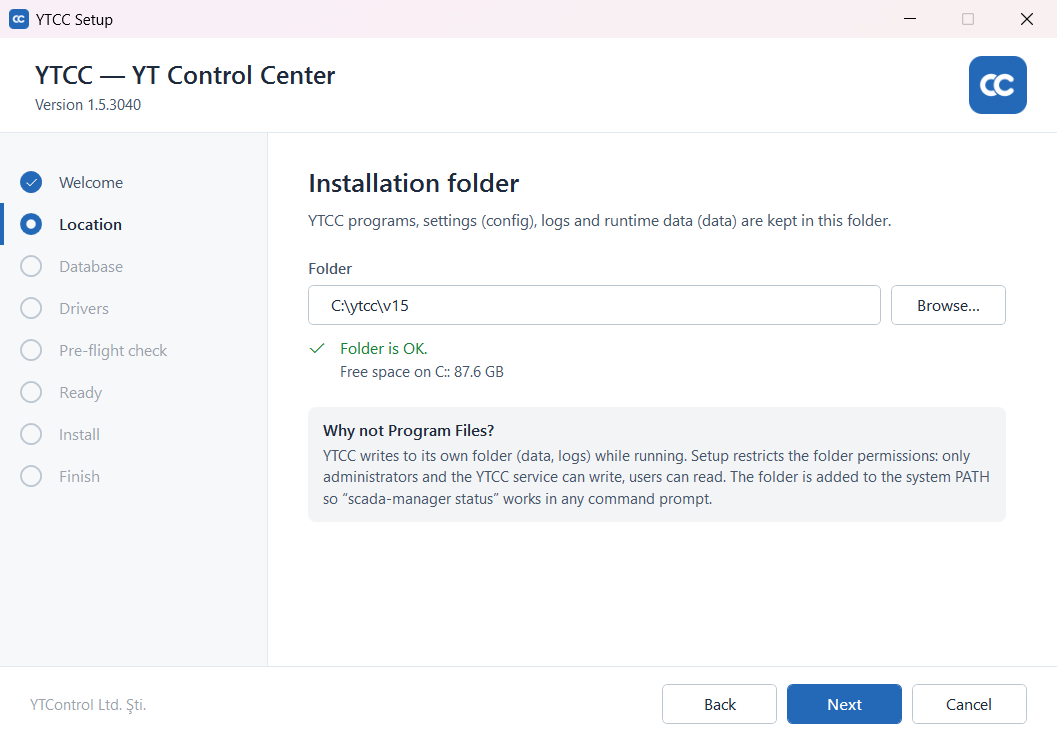
YTCC writes its settings, logs and runtime data to its own folder, so the setup program does not accept a folder under
Program Files or the Windows folder, a drive root such as D:\, or a network folder; the message under the field says
why. If the folder exists and is not empty, the page warns that the YTCC files will be written into it.
4. Enter the database password
On the Database page, the setup program shows whether the PostgreSQL service postgresql-x64-18 is running and
whether port 5432 answers. Enter the password of the postgres user under “postgres” password; Show shows what
you typed. Click Test connection. The page shows Connected with the PostgreSQL version, or Could not connect
with the reason, such as wrong password.
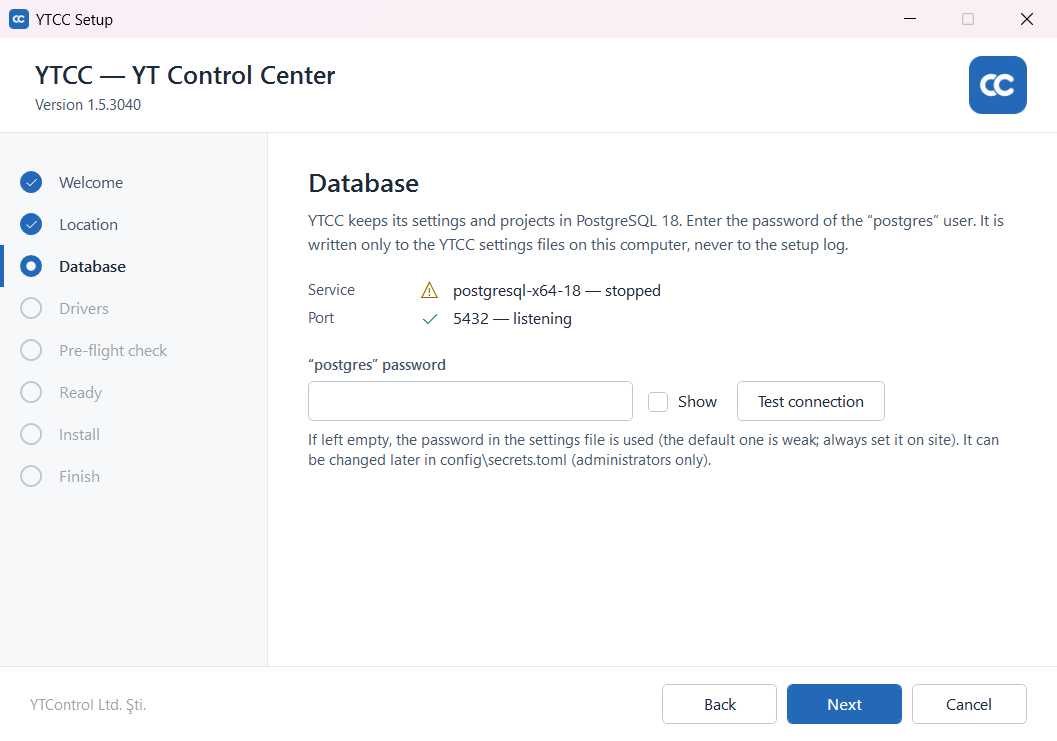
A yellow sign on the Service row, as in the example, means that the service is stopped; start it before YTCC starts (see step 6).
The password is kept on this computer in a settings file that only administrators can read, and never in the setup log. In a new installation always enter it: left empty, YTCC cannot connect to a PostgreSQL with another password. In an upgrade, a repair or a driver change, leave the field empty to keep the current password. To change the password later, run the setup program again, choose Repair and enter the new password on this page.
5. Choose the drivers
On the Field drivers page (Drivers in the list on the left), choose one of:
- Typical — all drivers: every driver is installed. This is the recommended choice, because a driver missing in the field means a project driver that does not start, and the disk space saved is small.
- Custom — I will choose the drivers: only the drivers you tick are installed. Select all and Select none change all of them at once.
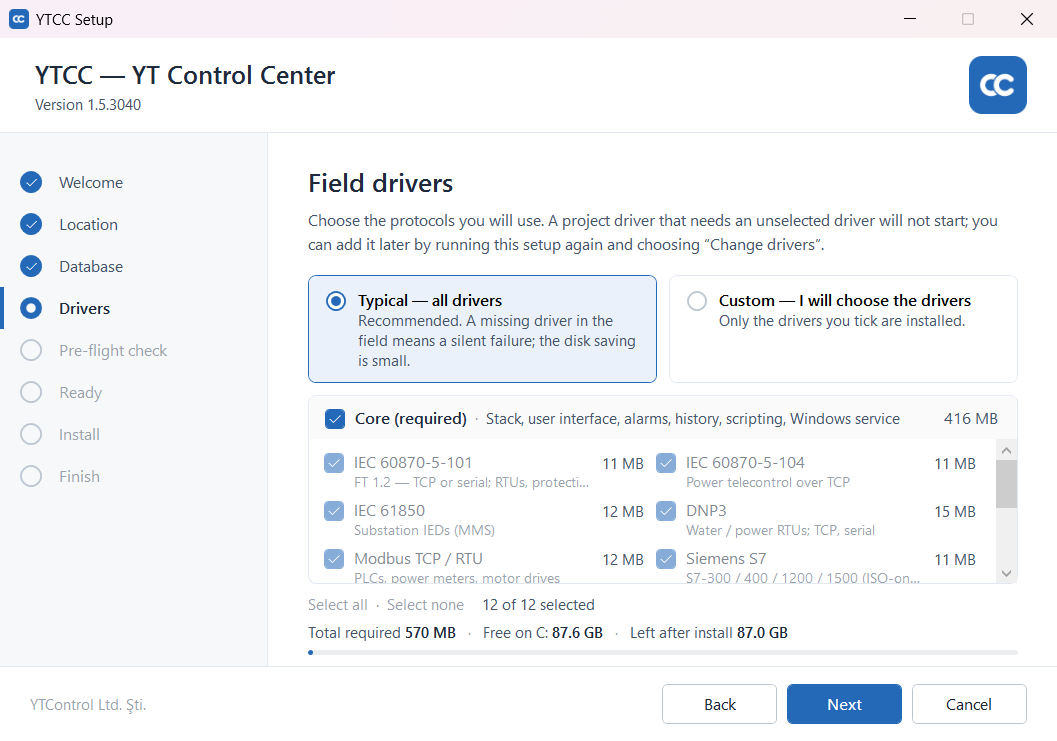
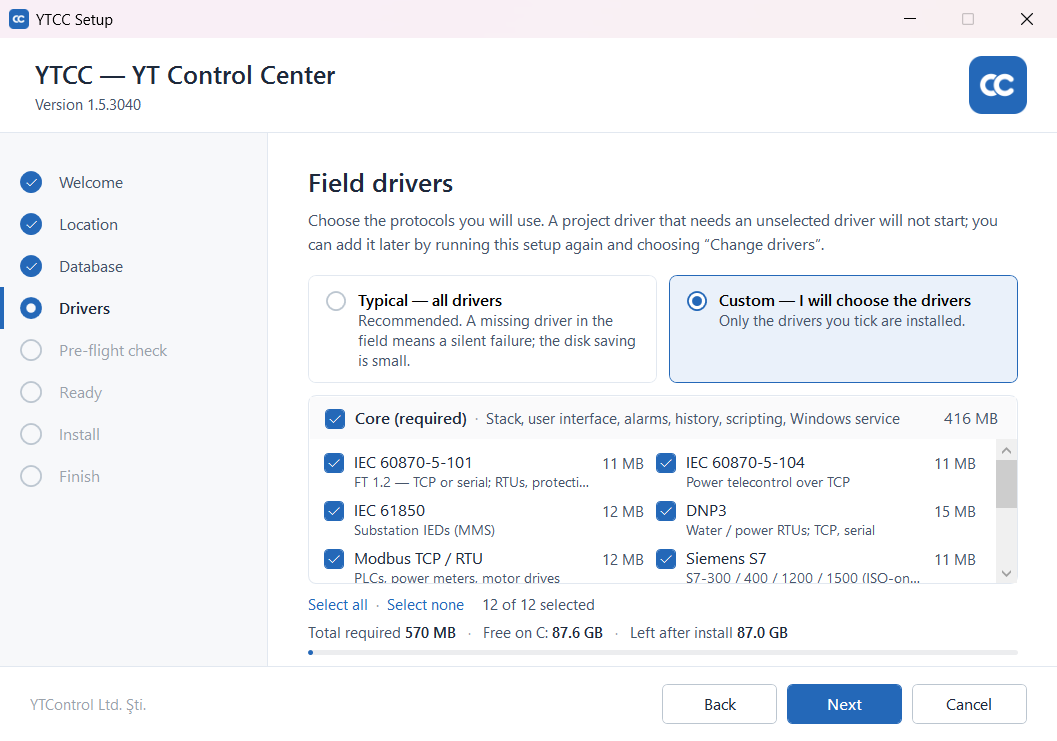
Core (required), with the runtime, the user interface, alarms, history, scripting and the Windows service, is always installed. The page shows the size of each driver, Total required, the free space on the drive and Left after install. Next stays disabled when the space is not enough. With no driver ticked, the page warns that only internal signals and simulation will work.
To add a driver later, run the setup program again and choose Change drivers.
6. Check the pre-flight results
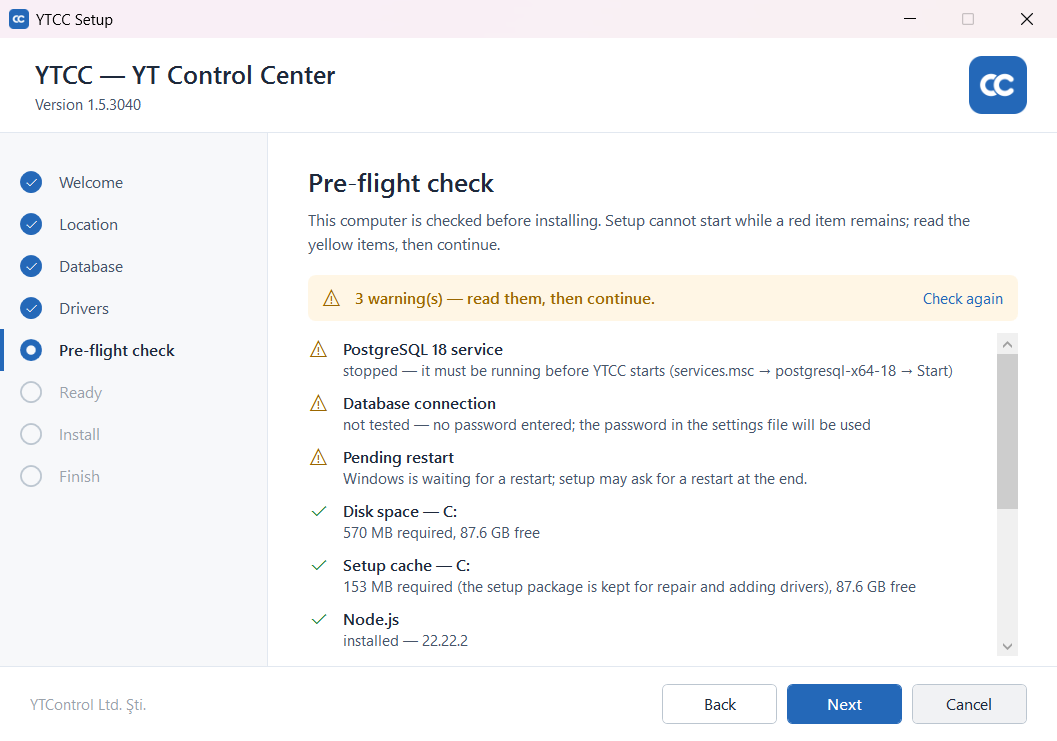
The Pre-flight check page checks the computer before installing. Each item shows a spinning icon until its result is known. A red item blocks the installation, and the summary names the blocking items; fix them and click Check again. Yellow items are warnings: read them, then click Next.
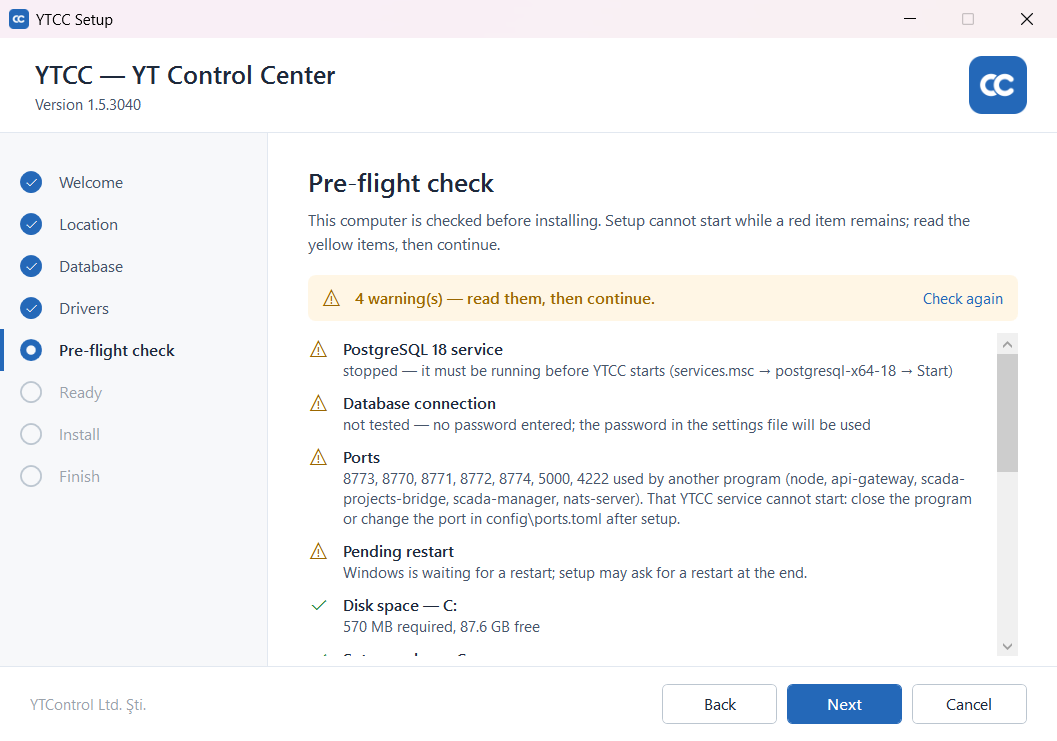
| Item | Red, blocks the installation | Yellow, a warning |
|---|---|---|
| Disk space | The installation drive does not have the space required. | |
| Setup cache | The system drive cannot hold the copy of the setup package that Windows keeps for repairs and for adding drivers. | |
| PostgreSQL 18 service | Not found. | Stopped: start it in Services (postgresql-x64-18) before YTCC starts. |
| Database connection | The connection failed, or no password was entered. YTCC is installed but cannot connect; go back to the Database page. | |
| Node.js | Not found. | |
| Ports | A port is defined by another YTCC installation on the computer, also when that installation is stopped. | A port is used by another program, named in the message. That YTCC service cannot start until the program is closed. |
| Running YTCC | YTCC runs now and is stopped during the installation. | |
| Pending restart | Windows waits for a restart; the setup program may ask for one at the end. | |
| Old YTCC installation | An early installation is in the same folder as this one, or in a folder that contains it. Click Back and choose Remove old installations, then install fresh on the YTCC on this computer page. |
Two items are information, marked with an i, and are not counted as warnings: Antivirus names the folder to add to the exclusions of the antivirus program, and Administrator rights reminds that Windows asks for them when you click Install.
When PostgreSQL or Node.js is missing, the item has a link, Download PostgreSQL or Download Node.js with the version number, for the Windows x64 version that YTCC requires. The link opens in the default browser. Install the program, then click Check again.
Stop YTCC now next to Running YTCC stops it at once, with administrator rights. If you stop YTCC here and then cancel the setup, start the YTCC service again in Services.
7. Accept a suggested port block when the ports clash
When a port clashes with another YTCC installation or with another program, the page suggests a free port block below
the list, with the ports it would use, and the button Continue with suggested ports. Nothing changes until you click
it. The Ports item then shows the block that will be used and the address of the interface, for example
http://localhost:8873. The block is written to the settings of this installation, the change is recorded in
logs\kurulum-portlar.log in the installation folder, and the shortcuts open the interface at the new port.
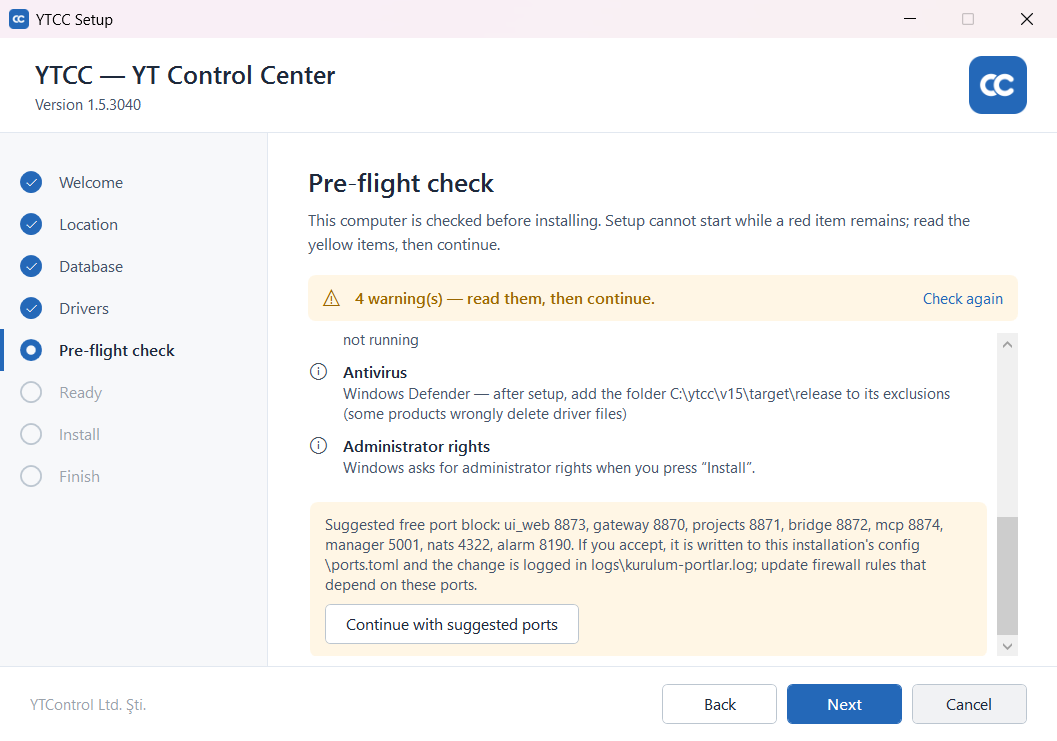
Update firewall rules that depend on these ports. See Install versions side by side for how the blocks are numbered.
8. Review and install
The Ready to install page summarises the action, the folder, the drivers, the space required and the database setting, and repeats the warnings.
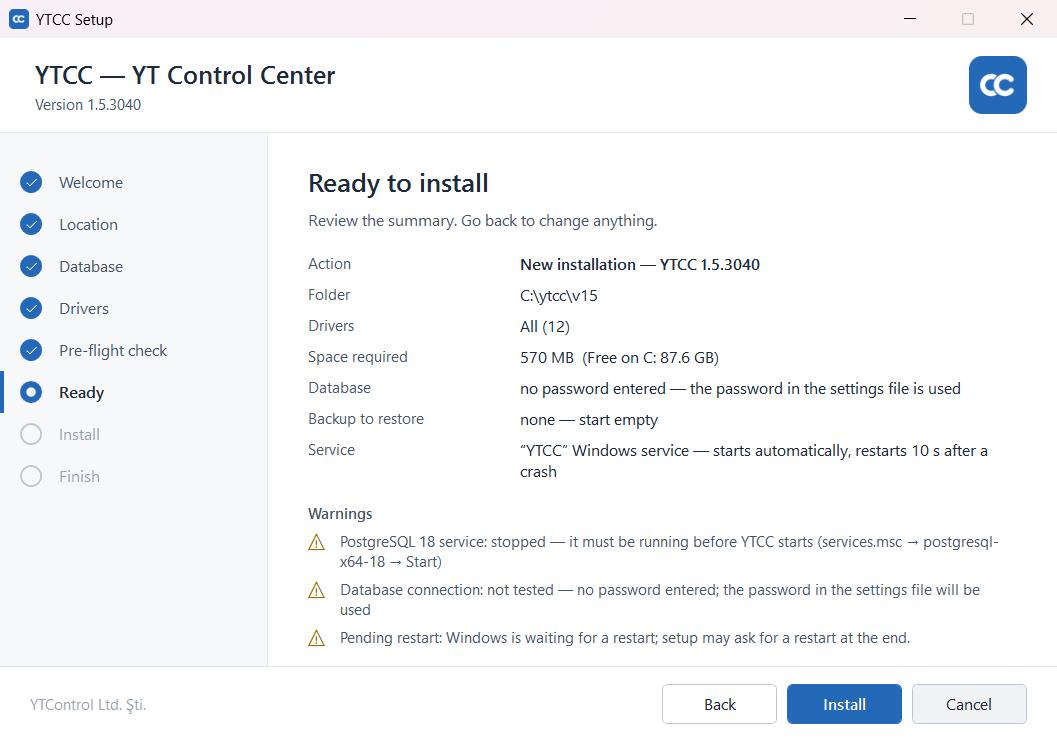
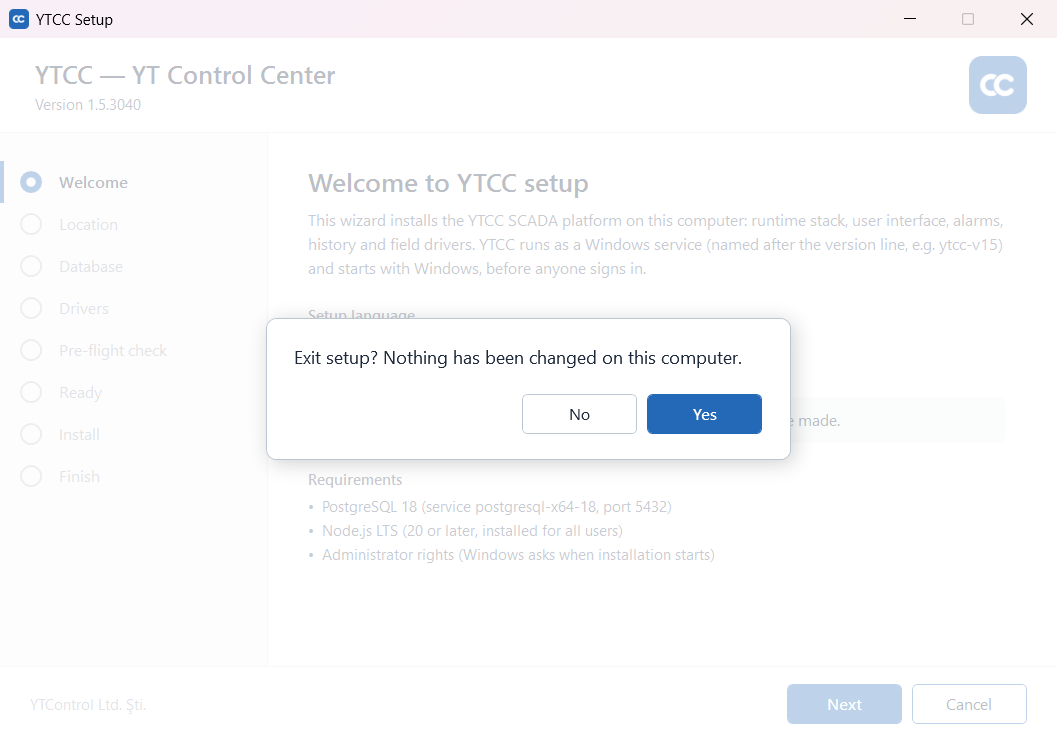
Up to this page nothing is changed on the computer. Cancel asks Exit setup? Nothing has been changed on this computer.; Yes closes the wizard.
If YTCC of this line is running, select the check box Understood: the running YTCC will be stopped and field monitoring will pause for about 5 minutes. The install button stays disabled until it is selected. Other lines keep running.
Click Install, or Upgrade, Change or Repair, depending on the action. Windows asks for administrator rights. The progress page lists the steps, for example Stopping the running YTCC, Copying files and Starting the service; the running step has a spinning ring. Details (live log) shows the last lines of the setup log, and Open log opens it. Do not close the window.
If you cancel or the installation fails, run the setup program again. The projects, the databases and the settings are not affected.
9. Finish the installation
The last page, YTCC is installed (or YTCC is upgraded), shows the version, the service and the address of the
interface, by default http://localhost:8773. Open the user interface now is selected: Finish then shows
YTCC is starting, waits until YTCC answers, at most two minutes, and opens the interface in the default browser. If
YTCC does not answer in time, the first start may still be under way: click Open in browser anyway, or Open log
folder.
A step of the configuration that could not be done, such as writing the port block or the database password, does not
stop the installation. The last page then shows Configuration warning: with the problem and Details: with the
log file logs\kurulum-yapilandirma.log. Run the setup program again and choose Repair, or contact your YTCC
supplier with the log.
If the installation fails, the page Setup could not finish shows What happened, Why and the path of the Setup log, with Open log.
Continue with First start and server administrators. To bring projects to the new installation, import their backups on the home page; see Import a project package from the home page.
What the setup program installs
| What | Where and how |
|---|---|
| Programs, web interface, message bus | The installation folder, for example C:\ytcc\v15, with the settings in config, the logs in logs and the runtime data in data. An upgrade keeps the settings, the logs and the data. |
| Windows service YTCC v15 | Starts YTCC. See The YTCC service. |
| Shortcuts | YTCC v15 (Edge) and YTCC v15 (Chrome), one for each of these browsers that is installed, on the desktop, in the Start menu and in the installation folder. They open the interface in an application window of its own, without an address bar, at http://localhost:8773/ or at the port of the suggested block. Without either browser, the shortcut YTCC v15 opens the default browser. |
| Folder permissions | Only administrators and Windows itself can change the installation folder; users can read it and run the programs. |
| Read Me files | Read Me.txt (English) and Beni Oku.txt (Turkish) in the installation folder: the service, the shortcut, upgrade and removal in brief. |
| Help documents | help in the installation folder: the documents of the Help window on the home page. |
| Claude Desktop extension | mcp\ytcc.mcpb, offered by Download the Claude Desktop extension in the AI access (MCP) view. See Connect an AI assistant. |
| Sample projects | Only in setup programs that carry them. A new installation imports them before the service starts, so they are in the project list at the first start; they have no users and sign-in is off. The result is in logs\kurulum-ornek-projeler.log. An upgrade does not import them again. |
| Setup package copy | C:\ProgramData\Package Cache, about the size of the setup program, for repairs and for adding drivers. |
The setup program does not install PostgreSQL or Node.js.
If the antivirus program removes or blocks YTCC programs, add the folder named on the Antivirus item of the
pre-flight check, <installation folder>\target\release, to its exclusions.
The YTCC service
The service of the line v15 is listed in Services as YTCC v15. It runs as the local system account, starts
automatically when Windows starts, before anyone signs in, and starts after the PostgreSQL service. The project that ran
last starts again with its drivers.
- If YTCC ends with an error, Windows restarts the service after 10 seconds.
- Stopping the service stops YTCC within about one and a half minutes; it does not hang.
- To stop or start YTCC by hand, select YTCC v15 in Services (Windows key, type
services) and click Stop or Start. This needs administrator rights.
Change drivers or repair
Run the setup program of the installed version again, or open Settings › Apps in Windows, select the entry of the line, for example YTCC 1.5, and choose Modify. On the YTCC on this computer page, choose Change drivers or Repair (see step 2). Both go through the Database page; Change drivers opens the Field drivers page with the installed drivers selected.
Upgrade with the setup program
Run the setup program of the new version on the server, choose Upgrade (recommended) in step 2 and follow the steps above. The setup program stops the running YTCC of this line, replaces the programs, keeps the folder, the settings, the projects and the driver selection, upgrades the databases and starts the service again.
The databases are upgraded while YTCC is stopped. Each project whose database is older than the new version is backed up
first, to data\backups\yukseltme-<time>\ in the installation folder, and its database is upgraded only if the backup
was taken. A project that could not be backed up or upgraded is left as it was and named in a configuration warning on
the last page; the home page then shows Upgrade needed for it, and Upgrade… in its menu upgrades it (see
Upgrade a project from the home page).
The setup program of a new line does not upgrade: it installs next to the old line. Take the projects over as described
in Upgrade to a new version and roll back. An early installation from
before version lines (folder C:\YTCC, service YTCC) is not upgraded either. If its folder is separate, for example
D:\YTCC, the new setup program installs next to it; if it overlaps the new folder, remove it first as described in
Remove old installations, then install fresh.
Remove YTCC
Open Settings › Apps in Windows, select the entry of the line, for example YTCC 1.5, and choose Uninstall. The setup program opens on the Remove YTCC page and asks what should happen to the data:
- Remove the program only (recommended) keeps the projects, the settings and the databases.
- Full clean-up deletes all databases of this line and the installation folder, without a backup.
- Back up the projects I pick, then clean up backs up the selected projects to
C:\ytcc-yedek\, then cleans up.
Other lines are not touched. For the steps, the confirmation and what to do when a step fails, see Uninstall YTCC.
Remove old installations, then install fresh
On the YTCC on this computer page (step 2), tick the installations to remove and choose Remove old installations,
then install fresh (with the same version installed: Remove the ticked ones, then install fresh). The list can hold
older versions of this line, other lines and an early installation from before version lines. They are removed one after
the other with one administrator approval, each with the backup and the options described in Remove YTCC.
Each installation gets its own backup folder under C:\ytcc-yedek. If a backup cannot be taken, nothing of that
installation is deleted and the following installations are not removed.
When the removal is done, Continue with a clean installation goes on with the installation of this version.
Result
The service YTCC v15 runs, and the YTCC v15 shortcuts open the interface, by default at
http://localhost:8773/. Continue with First start and server administrators.
Troubleshooting
| Symptom | Cause | Solution |
|---|---|---|
| Next stays disabled on the Welcome page | A newer version of the same line is installed. | Use the setup program of the newer version, or remove the newer version first. |
| Old YTCC installation is red | An early installation is in the same folder. | Click Back and choose Remove old installations, then install fresh. |
| PostgreSQL 18 service is red | PostgreSQL 18 is not installed, or not under the service name postgresql-x64-18. | Use the download link of the item, install PostgreSQL 18 with its default service name and port 5432, then click Check again. |
| Node.js is red | Node.js is missing or was installed only for one user. | Use the download link of the item, install Node.js for all users, then click Check again. |
| Ports is red | Another YTCC installation defines the same ports. | Click Continue with suggested ports. |
| Database connection is yellow | The password is wrong or was not entered. | Click Back to the Database page, enter the password and click Test connection. |
| The last page shows Configuration warning: | A configuration step, such as the port block, the database password or a database upgrade, could not be done. | For a project that was not upgraded, use Upgrade… on the home page. Otherwise run the setup program again and choose Repair. |
| YTCC did not answer within 2 minutes | The first start takes longer, or YTCC cannot connect to PostgreSQL. | Click Open in browser anyway after a minute. If the interface does not open, check that the PostgreSQL service runs and repair with the right password. |
| The removal stops with The removal was stopped because the projects could not be backed up. | A project could not be backed up; nothing was deleted. | Read the backup log named on the page, fix the cause and remove again. |
| The sample projects are not in the project list | The import failed, or the installation was an upgrade. | Create a project from a sample later with the New Project form (see Content packages). |
| The installation failed | Shown on the last page. | Click Open log. Run the setup program again. |
Good to know
- An IT department can also install YTCC without the wizard, for example by software distribution. Ask your YTCC supplier for this.